Acorn Processing and Cookies
What better way to finish off the Autumn season than to gather, process, and bake up some tasty and timeless Acorn Cookies with your family!
We have been baking and cooking with our local coastal oak acorns for the past several years and these cookies have become a crowd favorite.
Gathering and processing the acorns are the first steps to making these cookies and the most time-consuming steps. However, I find this part to be the most fun, especially with little explorers!

Finding a Cookie Recipe:
You’ll need to pick a recipe or two and get your ingredients together. Pascal Bauder’s Cherry Chestnut Chocolate Chip recipe is by far our most favorite (substituting the chestnut flour for acorn flour). To find this recipe you will need to purchase his Wildcrafted Cuisine book. Otherwise, you can use just about any simple chocolate chip cookie recipe on the internet- like this one! You can choose to substitute half or all of the flour in the recipe for the acorn flour you’re about to process.
Identifying:
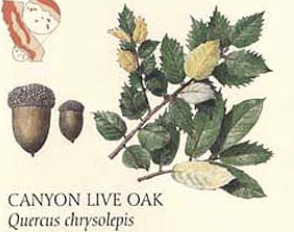
First, you will need to properly identify your acorns. Coastal oak trees have round leaves with pointed tips around the edges. There are many varieties of Oak trees but all produce edible acorns. Use this guide to identify your acorns! If you gather more than one kind, make two batches and have a taste testing party at home!
Coastal live oak acorns are found all over the Santa Monica Mountains, but, they are native, protected, and it is illegal to gather acorns on park property. So, reach out to family members or friends who may have an oak tree in their backyard.

Gathering:
Native Americans gathered acorns before they fell from the trees but it is ok to still gather the acorns on the ground (best to do so if the acorns haven’t been sitting in water/wet soil for too long). While gathering, be sure to leave some behind for the squirrels and plant a few for the next seven generations who will come after you and me.
Oak trees don’t produce large bounties of acorns each year. In fact, they will produce a large number of acorns every few years. This is also known as a “mast year” and is dependant on the weather (learn more here). When gathering your acorns, gather more than you think you need (about one gallon). Store them in an airtight container and in a cool dark place until you are ready for the next steps. It’s important that you don’t let them sit for too many days before moving onto the next steps as mold could form in the container and ruin your harvest. You may also find a few grubs crawling out of the shells and finding a new home if you don’t move onto the next step soon.
Dehydrating:
Using a dehydrator, lay the acorns on the dehydrating trays. I like to leave the shells on. The dehydrator should be set to 115 degrees. If you don’t have a dehydrator you can also use a cookie sheet and an oven set to the lowest temperature or the warm setting (as long as it doesn’t surpass 115 degrees). The acorns can take anywhere from 24-35 hours to dehydrate. Check on them every 6hours or so by taking one out and cracking it open with a mortar and pestle. If you try to bend the meat in two and it bends at all, there is still moisture in the acorn and it needs to go back into the dehydrator. The acorns are ready when they snap clean in two pieces. When you are able to snap a few of the bigger ones in two with your fingers, the entire batch should be ready for cracking open!
Shelling:
Get your crew together and get to smashing (this is the fun part). Find a few stones outside or use a mortar and pestle and begin shelling the acorn meat from the woody capsule. Place all of the acorn meat into a large bowl and set to the side. You will want to do this step outside or over a large canvas blanket because it gets quite messy!

Grinding:
The most time-consuming part of the process is grinding the acorns down into flour. We usually spend some time doing this the primitive way using a mortar and pestle or primitive river stone. This is one way we honor the Chumash and Tognva peoples who considered the acorn to be a staple in their diet (used in soups, breads, etc). This process a long time so we usually stop after a short while to send all of the acorns to the Vitamix or food processor. Blend them until there are no chunks left in the flour.

Leaching:
Acorns are not palatable or easily digested if eaten raw due to the presence of bitter tannins. There are plenty of methods used by Native American’s to rid the acorns of these tannins. One way the Native peoples would leach the tannins by wrapping the acorns in a cloth or burlap bag and submerging them in a running river. Allowing the water to flow through the acorns overnight would rid the acorns of the water soluble-tannins by morning.
At EverWild, we often use the “pour over” method. To do this you would need a strainer, a flour sack, or thin cloth (not cheesecloth). Add the cloth to the strainer and place your acorn flour inside the sack. Then, pour water over the flour and into the sack allowing the strainer to fill up with water slowly (as if you were making a pour-over coffee). Allow the water to leach the bitter tannins out of the bottom of the strainer and onto the ground. Squeeze the water out of the cloth by twisting the top of it and pressing the water out of the flour. Repeat this process until you have used roughly 3-5 gallons of water. Test taste the flour early on (the bitterness will make you want to spit it out). Test taste the flour after a couple of gallons to see if you still taste the bitter tannins. The tannins have been leached when you are left with an earthy and nutty flour.


Baking Right Away:
To bake right away you will need to take into account the moisture in your flour when adding the liquid from your recipe. For example if your recipe calls for 1 cup of milk, perhaps begin with 1/2C or 1/4C (you can always add more before making cookies and sending them to the oven).
Reminder- You can either replace all of the flour in your recipe with acorn flour or, use half the amount of flour asked and half acorn flour.
Storing for Later:
Your wet acorn flour will keep in the freezer for about a year. Otherwise, you can lay your wet flour on a silicon dehydrator mat and dehydrate the flour until it is completely dry. Store in an airtight container and in a cool dark place.
If you harvested lots of acorns but you don’t plan to leach them all, you can store the dehydrated acorns (still in their shells) in an airtight container and in a cool dark place. They will keep for about a year.

There are so many different ways to process acorns. Leave a comment below if you have a different method that you love! If you made cookies, pancakes, soup, or anything else using this acorn processing method, we would love to see it! Leave a comment below or tag us on Social Media:
https://www.instagram.com/everwildla/
https://www.facebook.com/EverWildLa/
Happy Acorn Hunting, processing, and baking!